
Fix Rounded Back with this 4 step posture correction program
Fixing Hunchback can be tricky since the process that you have to follow to correct your posture differs from the standard process of strength training. As we saw in my YouTube video, the solution of Hyperkyphosis comes through a 4 step posture correction program.
The 4 step process to fix Hyperkyphosis:
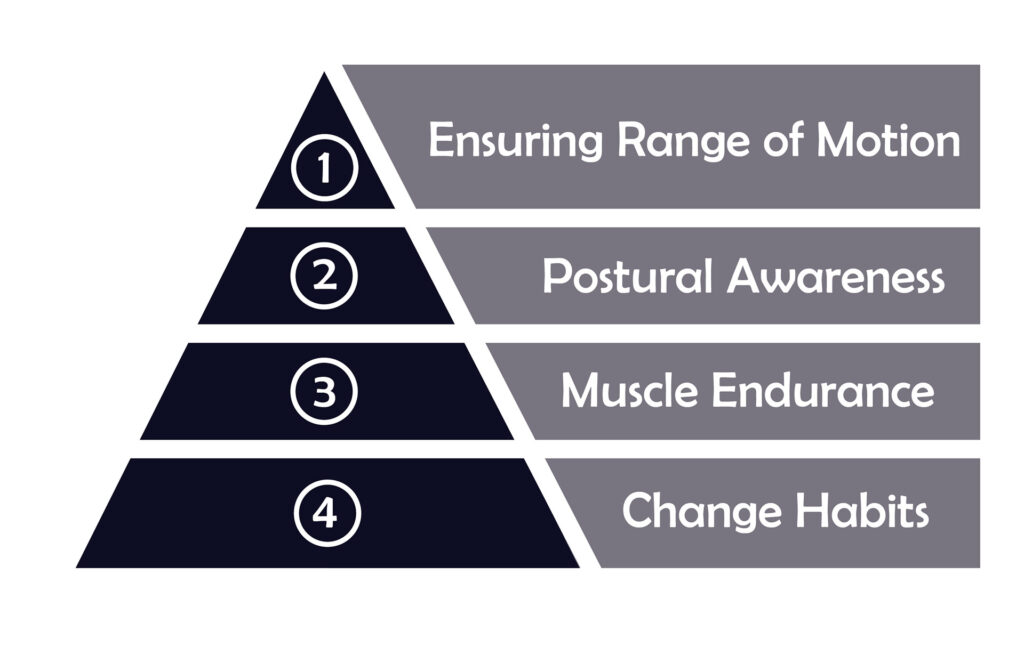
Step 1 – Ensuring Range of Motion
Step one is about ensuring that you have the range of motion needed to go from a rounded back (hyperkyphosis) to kyphosis (neutral back).
If you can already do that, you can go directly to step two, or use the exercises of step one as a good activation of these extra angles. However, if you’re not able to actively pull your thoracic spine back to neutral position, you’ll need to train your body in that extra range of motion.
To do that you’ll need to practice the two exercises below.
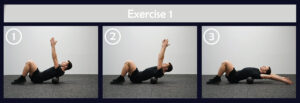
Exercise 1
Exercise one works with the assistance of gravity. Use a foam roller or any object that can support your spine to do a spine extension supine on the floor. You can do this with a foam roller, a pile of books, a hard pillow or any type of object that feels comfortable.
The exercise is divided into two parts. First a full extension of the thoracic spine where you should make sure you reached the maximum range of motion of your spine’s extension. Then from this position bring your arms overhead and try to reach as far as possible. Slowly return, first your arms, and then your spine to the starting position.
Start with:
2 sets, of 8 repetitions with 40’’ rest
How to progress:
In this exercise you mainly progress by trying to reach a bigger range of motion in each repetition. Besides this, you can slowly add more repetitions and sets to increase the volume of the training stimulus. It makes sense to gradually go to:
3 sets, of 10 repetitions with 40’’ rest
Note:
The movement of the arms should be slow and controlled. The goal is to assist the extension of the spine. Spend some time (1-2 seconds) at the end position (position 3) to make sure that you reached the maximum range on each repetition.
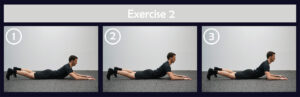
Exercise 2
The second exercise of step one is a prone spine extension with elbows on the floor. This is an isometric exercise. Again, the aim of the exercise is the extension of the thoracic spine so don’t advance to standing on your palms cause this will alter the mechanics of the exercise in a way that your lumbar spine will be targeted more.
Start with:
2 sets, of 30’’ hold with 40’’ rest
How to progress:
In this exercise, you mainly progress by trying to bring your elbows closer to the shoulders and create a better extension on the thorax. The maximum range you can reach in this exercise is when your elbows are almost in line with the shoulders (position 3). In addition, you can slowly add more time and sets to increase the volume of the training stimulus. It makes sense to gradually go to:
3 sets, of 60’’ with 60’’ rest
Note:
While holding this position, be mindful of the position of your chest and shoulders. Your shoulders should be locked down, away from your neck and your chest should be facing forward as much as possible.
Step 2 – Increase Postural Awareness
Even though you might have the range of motion needed to go back to neutral position you’ll probably have a hard time understanding where the right position of kyphosis is (neutral back). Spending hours and hours in a hunchback position will make your body adjust to it and perceive it as your new normal. In order to be able to assume the correct position at any given time you’ll need to develop postural awareness.
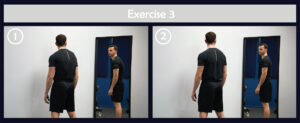
Exercise 3
The only exercise you’ll need here is practicing going from hyperkyphosis to kyphosis next to a mirror. Move from rounded back to neutral back and hold your position for 2’’ every time you reach the neutral position on the spine.
Remember that the correct posture still has a degree of curvature towards the front; trying to stay completely straight is another postural aberration called hypokyphosis. Also, remember that the correct posture is defined between a range of angles, so don’t go too far by trying to define the correct angle by 1 or 2 degrees of certainty. By practicing this movement and taking feedback through the mirror, you will quickly gain a good understanding of the range in which the spine is considered neutral.
Start with:
2 sets, of 10 repetitions with 2’’ hold and with 40’’ rest
How to progress:
Progress by adding repetitions, and increasing the duration of each hold. It makes sense to gradually go to:
3 sets, of 8 repetitions with 4’’ hold and with 60’’ rest
Note:
If you don’t have a mirror you can use your phone in selfie mode. If you feel that you are making progress you can challenge yourself by practicing without looking at the mirror and use it only to check if you are still able to assume the correct position. Once you’re able to assume the correct position with ease you can consider this exercise done.
Step 3 – Develop Muscle Endurance
Increasing muscle endurance in the muscles that will keep your spine in neutral position is crucial if you want to have lasting results. Many people have the range of motion needed and can quickly understand where the neutral position is (steps 1 and 2), but they can’t hold this position for a prolonged period of time. For this reason, step 3 is about exercising muscle endurance on the muscles that support your spine in neutral position. To do that you’ll need two exercises.
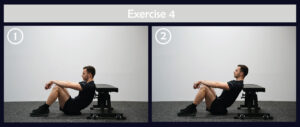
Exercise 4
The first exercise is with the back against a bench or a couch. Position yourself on the floor with your back against a bench or a couch. The touchpoint of your back should be at the center of your shoulder blades or the height of your armpit. From this position move from hyperkyphosis to kyphosis and hold it for an amount of time.
Start with:
2 sets, of 8 repetitions with 4’’ hold and with 60’’ rest
How to progress:
Progress by adding repetitions, and increasing the duration of each hold. It makes sense to gradually go to:
3 sets, of 8 repetitions with 6’’ hold and with 60’’ rest
Note:
The aim of this exercise is to fatigue the spine extensors so expect some discomfort at the end of each set. If you feel that you can challenge yourself a bit more you can elevate the position of your hips in relation to the bench. This will change the angle of your support and increase the intensity. You can do this simply by using a pile of books to seat on.
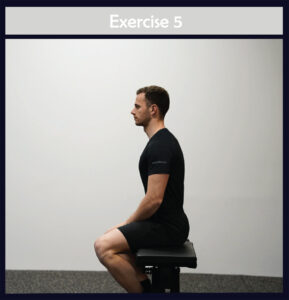
Exercise 5
The second and probably the best exercise to increase muscle endurance is fortunately holding the neutral position itself (kyphosis). This means just holding the correct position. Remember that ss with almost every activity that you want to get better at, you need to keep most of your energy on the activity itself. So practice kyphosis simply by holding the neutral posture in different setting throughout you day, for time and sets. This is an isometric exercise which you can easily do as a break from your work or during rest intervals at the gym.
Start with:
2 sets, of 60’’ hold and with 60’’ rest
How to progress:
The main way to progress in this exercise is by increasing the time on each set. It makes sense to gradually go up to:
3 sets, of 3 minutes hold and with 60’’ rest
Note:
Once you can easily do more than 3 minutes on each set then you should be practicing kyphosis as a habit for long durations throughout you day. For that take a look at step 4.
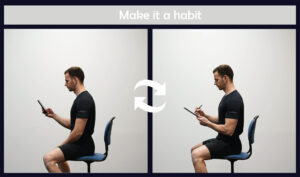
Step 4 – Change Bad Postural Habits
Step for is all about changing your habits and making sure that you will get rid of the rounded back posture once and for all. Think about this, when you start searching about how to fix your hunchback what you were actually trying to do was to reach a state where you can hold kyphosis (the neutral back) for the hours you were previously on rounded back. Using the preparation from steps one to three, you can slowly start practicing kyphosis throughout your day and most importantly during the hours that you were previously on rounded back.
Remember, that no matter how much time you put into your practice, if you keep spending hours and hours out of posture, your body will choose to adapt to this. 8 hours out of posture is a much greater stimulus for your body than 10’ of posture correction exercises.
So, simply train your endurance in this position at the times during which you were previously destroying your posture. Thus, replace a bad habit with your endurance training from step three.
I’ve found that the best strategy is to schedule reminders throughout your day and most importantly during the hours that you know you’ll need them most.
Note:
Besides that, you’ll need to adjust your environment according to your body and needs. Adjustments like these would be placing your screen higher, choosing a better chair, or taking a more comfortable position when you’re on your phone. Take the time to identify which habits are responsible for your FHP and find alternatives that can slowly eliminate them.
Also note that no position is bad for a small amount of time and even the best posture must be altered by different positions or movement every now and then.
If you practice these steps I’ll be happy to hear about your progress in the comment section of my video on Fixing Hyperkyphosis! Keep it up!
